How to Analyze Your Best and Worst Performing Products
Learn how to analyze your best and worst performing products so you can improve cash flow, reduce slow-moving inventory, protect profit, and make smarter buying decisions.
Whether you’re recording employee hours for payroll or customer billing, your entries must be accurate. QuickBooks can help.
It’s easy to track the sales of goods in QuickBooks. You create an invoice or a sales receipt, select the product the customer wants along with the quantity, and save the transaction. QuickBooks reduces the corresponding inventory level and records the purchase in the correct account.
Accounting for services sold, however, is a bit more complicated. Whether you’re charging customers for consulting, labor, or any other task that gets billed by the hour, you have to both create records for that billable time and track the hours spent on it carefully. QuickBooks provides tools that simplify both chores.
You’ll use those same tools if you need to record the hours’ employees work for payroll purposes. QuickBooks allows you to track time in individual records and/or traditional timesheets. Here’s what you need to know.
Before you can start tracking time, you’ll need to make sure that QuickBooks is set up for that job. Open the Edit menu and select Preferences, then click on Time & Expenses. With the Company Preferences tab highlighted, click the button in front of Yes under Do you track time? If it’s not already filled in. Click the down arrow in the field next to First Day of Work Week to open the list and choose the correct day. If it’s appropriate, check the box in front of Mark all time entries as billable. Click OK.
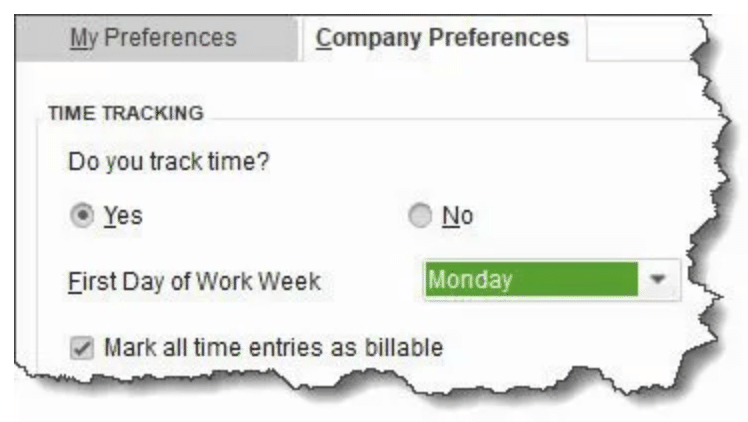
QuickBooks needs some information from you before you can start tracking time.
While you’re still in the Preferences window, click on Sales & Customers, then My Preferences. When you create an invoice for a customer with unbilled time, QuickBooks can open a window listing the billable services (Prompt for time/costs to add) or display a small box asking you whether you want to include those items (Ask what to do). Select your preference, or don’t add any, then click OK.
Let’s look first at creating individual time entries. Click the arrow to the right of Enter Time on the home page (or Customers | Enter Time) and select Time/Enter Single Activity. In the window that opens, make sure the Date is set to the date the service was provided (if that is different from the current date that appears). Click the down arrow in the Name field and choose the correct employee, and in the next field, select the Customer: Job.
Warning: If this work was done for a specific job, be sure to click on the actual job, not the main customer entry.
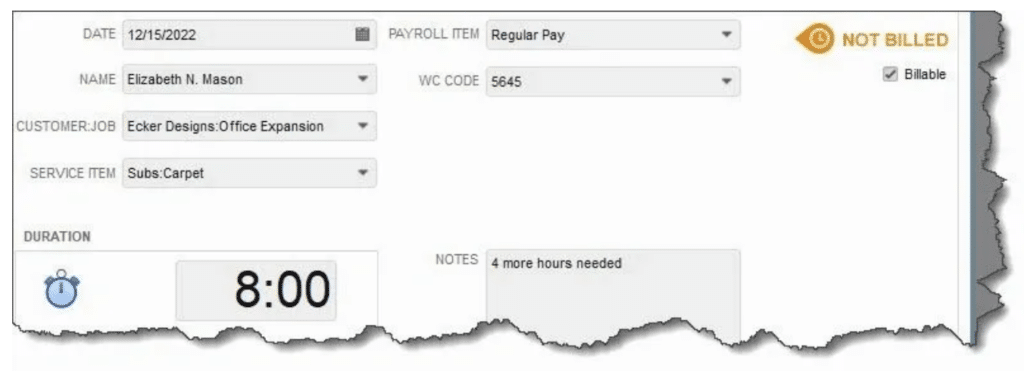
The Time/Enter Single Activity window
Next, select the Service Item, the actual work that the employee did. Below that, you can either enter the Duration worked manually, or click Start to launch the automatic timer. If the work is Billable, be sure to check that box in the upper right. Add Notes if you’d like.
The Payroll Item (pay type) and WC Code (workers’ compensation) fields will only appear if you have QuickBooks set up for payroll. If this is the case and don’t see those fields, minimize the Time/Enter Single Activity window by clicking in the upper right’s small horizontal line. Click Employees in the toolbar (or Employees | Employee Center) and double-click on the employee’s name. Click on the Payroll Info tab to the left. You’ll see a line toward the bottom that says Use time data to create paychecks. Check that box and click OK, then reopen the Time/Enter Single Activity window by clicking the double box icon in the screen’s lower-left. The two fields should be there.
When you’ve completed all of the fields required, save the time entry.
Note: Are you still doing payroll manually? It’s much easier to track time and pay employees if you’re doing payroll through QuickBooks. But setup can be complex, and we would want to guide you through the process. Let us know if you’re interested.
Creating time entries isn’t difficult, but it can be time-consuming if you have many employees being paid by the hour. So, next month, we’ll look at QuickBooks’ Timesheet feature. We’ll also show you how to get information about the time entries you’ve created and what to do if QuickBooks’ time-tracking isn’t robust enough to meet your needs. In the meantime, be sure to contact us if you need help with QuickBooks or your accounting in general.
Learn how to analyze your best and worst performing products so you can improve cash flow, reduce slow-moving inventory, protect profit, and make smarter buying decisions.
Many retail and eCommerce business owners wait until year-end, tax time, or a cash crunch to review inventory. By then, slow-moving stock, overbuying, missing products, and cash flow problems may already be hurting the business. Learn when to review your inventory and how a better rhythm can help protect your cash.
Many retail and eCommerce business owners run everything through one bank account and wonder why cash always feels tight. A Profit First approach helps separate money by purpose, including inventory, profit, owner’s pay, taxes, and operating expenses. Learn how six bank accounts can create better clarity around your business finances.